
Staff Scheduling Help
Preferences
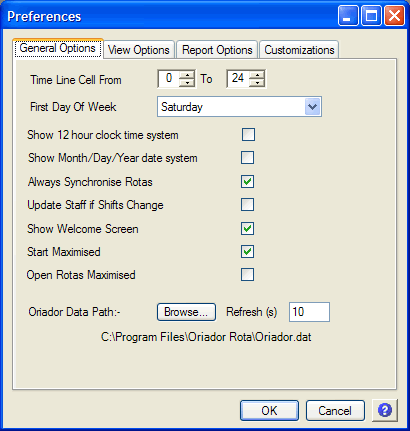
The preferences screen allows you to change the range of the time line window, and the first day of the week. The time line window allows you to reduce the size of the window, so that it only shows the period you are interested in - if you only ever work between 7am and 6pm, over half of the screen space used by each time line will be wasted displaying all 24 hours.
The first day of week allows you to choose the kind of display which you feel most comfortable with, you can choose to have either Sunday or Monday as the first day. If you change this, you may find you need to adjust your employment categories and staff working patterns.
The 12 Hour Clock option is used to toggle between 24/12 hour clock systems for time display. With this option selected 17:00 becomes 5:00PM.
The Show Month/Day/Year option is used to make the date formatting more consistent for international users. With this option selected, any fixed date formats in the software would become (for example) January 5, instead of 5 January.
The next three options relate to the Synchronisation process, an important process that happens as you open a rota file. During Synchronisation, the rota is updated with any changes, additions or deletions that you have made in the staff or system details since the last time the file was opened.
The Always Synchronise Rotas option (selected by default) indicates to the system that you automatically want to include staff changes, new staff, and any other data changes that might affect a saved rota. If you disable this, you will be prompted to synchronise each time you open a saved rota. You will have the option to either synchronise the Rota, or to open the Rota as it is, but with limited editing capabilities.
The Prompt Before Synchronising Old Rotas option will override the previous setting if the rota file End date has passed. This allows you to save time by automatically synchronising new and work in progress rota files, but preserving old rotas as they were for your records.
The Never Synchronise Old Rotas option takes it a step further. Rather than prompting, if the rota End date has passed the rota file will not be synchronised, it will be opened as is in the limited editing mode.
During Synchronisation (automatic or manual) you may be prompted to supply substitute values if items that formed an integral part of your rota have been deleted. For example, if you create a rota which includes a Role named "Cashier", and allocate that role to your staff, then delete the Role, you will be prompted to suggest a replacement Role for anyone who was allocated that role. At that point you can either choose another Role for them, or set those staff to Unallocated.
The Update Staff When Shifts Change option allows you to indicate to the system that you always want to update your staff working patterns if the shift template used to define their pattern changes. This only applies if their working pattern was unchanged from the template. For example, assume you have a 9am-5pm shift, and you use the shift to set this as the working hours for many of your staff. You can update the working pattern of all of those staff simply by updating the shift. If this option is not selected you will still be given the option to update your staff via a prompt each time you update your shifts.
Using the Show Welcome Screen option you can disable the welcome screen that you see upon starting Oriador Rota. The welcome screen is used to provide access to commonly used options, and to provide a quick summary of your data.
The Start Maximised setting is used to force the Oriador Rota window to start in a maximised state, to take full advantage of your monitor.
The Open Rota Maximised forces rota windows to use all of the available Oriador Rota window when opened.
The Oriador Data File is the location of the file which contains your staff and system details. You can use the Browse button to change the location or name of this file, either to switch between multiple sets of data, or to share your data with other Oriador Rota users over a network.
The Refresh option controls the refresh interval for the data file. This is only relevant if other users may be accessing your oriador data. If you are the only user using the file, you can disable the refresh by changing the value to 0. If you are sharing your data with other users over a network, the system will periodically check for updates to the file. This means that if another user changes some staff details, they will be incorporated into your rota as soon as the system notices the change. When a user enters the Staff Details, System Details, or Diary, the file will be locked. When the file is locked, any other user attempting to enter the Staff Details, System Details, or Diary will be warned of this and encouraged to cancel or open their form in read only mode. It is possible to override these file locks, however it is not recommended, as it will almost certainly result in one or both users losing valuable data (not to mention confusion).
The View Options Tab
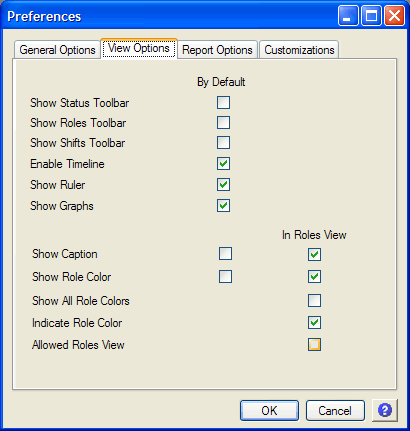
These new settings allow you to control the defaults for the rota view options. Detailed descriptions of each of the View options can be found in the documentation for the appropriate rota screens.
The Report Options Tab
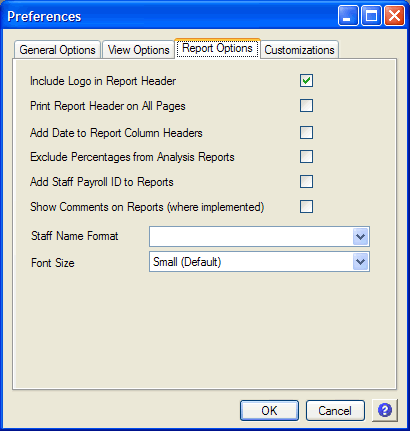
Here you can change some of the settings for the Reports.
The Include Logo... setting is used to disable the logo that will be printed in the report header of each report. The logo defaults to an Oriador logo, but you can customise it by placing a file called report.gif in the Oriador Rota directory. Suggested resolution is 200x100, but as long as the width to height ratio is 2:1, any size should be fine.
The Print Report Header on Every Page setting ensures that your logo will be printed on every page of your report, not just Page 1.
The Add Date to Report Column Headers option forces the reports to show the Date along with the day name in the reports. This is to complement the Week Commencing label for the report, to make it easier to see what date the column refers to.
The Analysis reports include percentages to show what portion of working time is spent on each role etc. Some customer feedback suggested that this could be confusing, or that it was just too much information, so the Exclude Percentages from Analysis Reports option will remove the percentage columns and just shot the basic data.
The Add Staff Payroll ID to reports option will show whatever Payroll ID you enter in the Staff Details section, next to the staff name, in the reports.
The Show Comments on Reports option will add a block of text at the bottom of certain rota reports, which will be built from any comments you set on the day or the staff member's day. This can be useful if you want to pass the rota reports to your staff, as you can communicate extra information via the comments.
Earlier versions were a little inconsistent in their choice of a format for the staff name in the reports. It is now possible for you to choose from a range of options using the Staff Name Format drop down box, the default is Firstname Surname (eg. John Smith).
The Customizations Tab
The options on the Customizations tab are intended to subtly change the behaviour of the system in certain circumstances. For the most part, the defaults will be fine, and you will never need to use these options, but you may find that you prefer them.
The first option, If you have a lot of staff... is useful if your shifts have been split into multiple different items. For example, if your shift is defined as just a single period from 9am - 5pm, this wouldn't make any difference. However, if you have the same shift split into 4 different periods (for different role assignments maybe, or more granular management of what staff are doing) is defined as 9am-10, 10-12, 12-3 & 3-5pm, then this option will make the Roles View put each member of staff into their own subment when you right click on a Role graph.
The second option, When working with the Roles View... is useful if you are using the Roles feature as a kind of Skills system. By activating this option, when you look in a Role's section for a day, you will see listed all staff who can be allocated that role... ie, you can see who has the skill. This differs from the Allowed Roles view menu option because the staff are not included in the Roles View graphs or staff level totals.
The third option, Set Hours to zero... allows you to indicate that when a member of staff is flagged with an Absence, you want their paid hours for that day reduced to zero.
The When Opening Rota drop down list allows you to choose how the system will determine the date to display when you first open a rota file. This is especially useful in longer rota files, and saves you have to scroll through a lot of the rota to find the data you need. The choices in the drop down are:-
- Goto First Week (Default) - The Rota will open at the first week of rota data.
- Goto Current Week - The rota will open on the current week.
- Goto Following Week - The rota will open on next monday/sunday, depending on your first day of week.
The Default Rota Length option is used to change the default length for new rotas when they are created.
The Use Fixed Patterns in new rotas and Include All Staff in new rotas options are used to control the default values for the New Rota options window.